

Exporting Press-ready PDFs from Adobe InDesign
Before Exporting Your Printing File for Uploading

We suggest you do a quick preflight of your job before exporting your PDF, paying particular attention to the following items:
- Make sure all items which print to the edge of the page bleed by at least 0p9 or 0.125 in, depending on your Units & Increments settings in Preferences.
- Spot colors in your document which are NOT intentionally being printed as spot colors should be converted to process. In InDesign, you can do this via the Swatches panel. Colors created using the RGB color space should be converted to CMYK, as well. Don’t forget spot colors in linked Illustrator files – if they’re not intentionally printing, you’ll need to change them in Illustrator.
- Make sure all colored images (e.g., photos) are CMYK, not RGB. (NOTE: images which intentionally use spot colors should remain as-is.) We suggest using Photoshop to make the conversions so you can control the results. (It also does a better job.) Although Apogee can convert images from RGB to CMYK, the results may not be what you are expecting.
- By the same token, make sure all the grayscale images are set to grayscale (unless they are intentionally printing in CMYK).
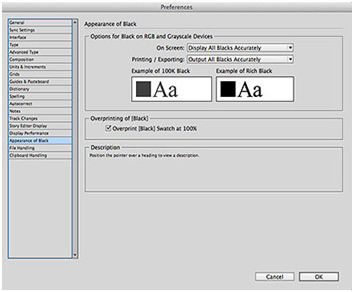
- In InDesign's Preferences panel, make sure Appearance of Black is set to Display All Blacks Accurately and Output All Blacks Accurately. In most instances, Overprint [Black] Swatch at 100% may be checked. (NOTE: if your design has any black boxes or larger black type that go over different colored areas — for example, partially over white and partially over a photo or tinted area — you may wish to uncheck the Overprint [Black]... box. Black boxes or type will be darker in the areas where they overprint colored areas or photos and lighter over white or light areas, which you may find unappealing to your design.)
Creating Your PDF
NOTE: The following settings and screen captures are from InDesign CC 2014. Other versions of InDesign may differ somewhat from what you see here, but the basic principles are similar.
Go to File > Export. You will have the opportunity to name your file. For Format, select Adobe PDF, click Save, and you’ll be able adjust the following:
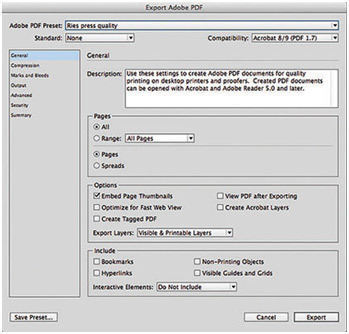
1. General
Standard — Set to None.
Compatibility — set to the latest version of Acrobat on the pull-down menu (currently Acrobat 8/9). This must be at least version 5.0 — if not, all transparency in your document (soft drop shadows, for example) will be flattened, which will cause trapping problems.
Pages area:
All or Range — as needed.
Spreads — In general, this should be unchecked.
Options area:
Embed Page Thumbnails — If desired, this may be checked.
View PDF after Exporting — If desired, this may be checked.
Optimize for Fast Web View, Create Tagged PDF, Create Acrobat Layers — Unchecked.
Export Layers — Set to Visible & Printable Layers.
Include area:
All boxes should be Unchecked.
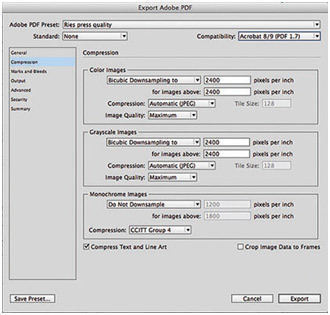
Compression
Color Bitmap Images, Grayscale Bitmap Images — sampling settings should be set to Bicubic Downsampling to. All pixels per inch entries should be set to 2400. Compression for each should be set to Automatic (JPEG). Image quality for each should be set to Maximum.
Monochrome Images — sampling setting should be set to Do Not Downsample. Compression should be set to CCITT Group 4.
Compress Text and Line Art — Checked.
Crop Image Data to Frames — Unchecked.
Marks and Bleeds
Marks area:
Crop Marks — Checked.
Bleed Marks, Registration Marks, Color Bars — In general, these should be unchecked.
Page Information — If desired, this may be checked.
Type — set to Default.
Weight — set to 0.25 pt.
Offset — set to 0p9 or 0.125 in, depending on your Units & Increments settings in Preferences.
Bleed and Slug area:
Use Document Bleed Settings — if you specified bleeds in Document Setup, then this should be checked. If not, and your document has elements that bleed off the page, use the manual settings to set the bleed in all directions to 0p9 or 0.125 in.
Include Slug Area — Unchecked.

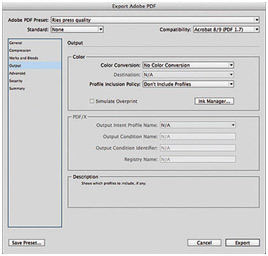
Output
Color section:
Color Conversion — set to No Color Conversion.
Destination will be grayed out.
Profile Inclusion Policy — set to Don’t Include Profiles.
Ink Manager... button — see below.
PDF/X section:
All options will be grayed out.
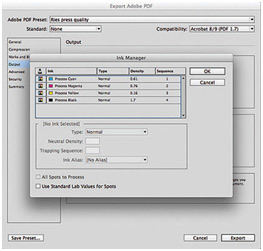
Ink Manager... button— Click this to make sure all colors that should be printing, will be. Some things to watch for:
- Cyan, Magenta, Yellow and Black will be listed whether they are being used or not.
- If your job is printing with spot colors, these should also be listed.
- If your job is printing only with process (CMYK) colors and spot colors are listed, make sure the All Spots to Process box is checked.
- If your job is printing with spot colors but more are showing up than are actually being used, cancel the Export and change the extra spots to process using the Swatches panel. Then, re-do the Export.
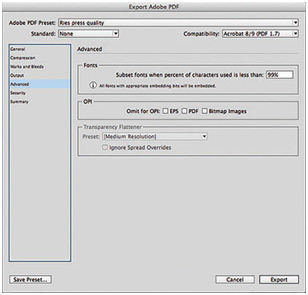
Advanced
Fonts section:
Subset embedded fonts when percent of characters used is less than: — Set to 99%. This setting is the percentage of characters in the typeface that can be used before InDesign will imbed the entire font. Sub setting can dramatically reduce the size of font-intensive PDF files.
OPI section:
All boxes should be Unchecked.
Transparency Flattener section:
All options will be grayed out.
Job Definition Format (JDF) section:
Create JDF File using Acrobat — Unchecked.
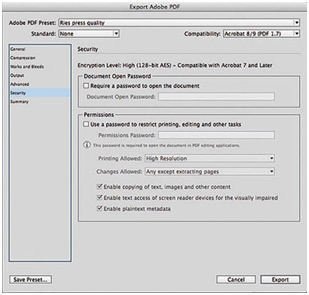
Security
All boxes and options should be either unchecked or grayed out.
Save Preset
Save your new job options so that you can use them when needed. We suggest a name like "PDF for Ries" or "Ries Graphics Press Quality."

