

Exporting Your Quark Xpress Files for Ries Graphics Online File Site
Properly Save Printing Files to Get the Image You Want Professionally Printed
We suggest that you do a quick preflight of your job before exporting your PDF, paying particular attention to the following items:
- Make sure that all color images are CMYK, not RGB. We suggest using Photoshop to make the conversions so that you can control the results. (It also does a better job.) Although Apogee can convert images from RGB to CMYK, the results may not be what you are expecting.
- By the same token, make sure that all grayscale images are set to grayscale (unless they are intentionally printing in CMYK).
- Spot colors in your document that are not being printed as spot colors should be converted to process. In Quark, go to Edit > Colors..., select the colors in question and uncheck the Spot Color box. Colors created using the RGB color space should be converted to CMYK, as well. Don’t forget spot colors in linked Illustrator files — you’ll have to change those in Illustrator.

Creating your PDF
NOTE: The following settings and screen captures are from Quark XPress 9. Other versions of Quark may differ somewhat from what you see here (especially Transparency settings, which we've noted below), but the basic principles are similar.
Go to File > Export > Layout as PDF.... You will have the opportunity to name your file and indicate a page range. Next, click Options... and note the following:
PDF Style — select Custom Settings.
Verification — select None.
Pages
Spreads — Unchecked.
Export pages as separate PDFs — Unchecked.
Include Blank Pages — Checked.
Embed Thumbnail — if desired, this may be checked with the Color Thumbnail option selected.

Meta Data (not shown)
Title, Subject, Author, Keywords — these may be filled in if desired.
Hyperlinks (not shown)
Include Hyperlinks — Unchecked.
All other options will be grayed out.
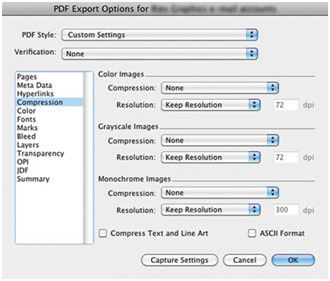
Compression
Color Images, Grayscale Images, Monochrome Images — all Compression settings should be set to None. Resolution for each should be set to Keep Resolution.
Compress Text and Line Art — Unchecked.
ASCII Format — Unchecked.
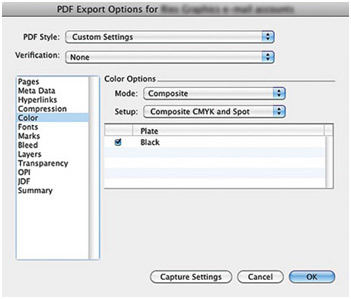
Color
Mode — Composite.
Setup — Use Composite CMYK or Composite CMYK and Spot, depending on the requirements of your job. Check the Plate list to make sure that the colors that are supposed to be printing are present. If your job is printing with spot colors but more are showing up than are actually being used, cancel the Export and change the extra spots to process using Edit > Colors... . Then, re-do the Export.
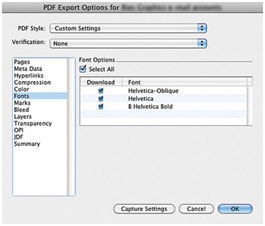
Fonts
Select All — Checked. Check the Font list to make sure that the fonts that are supposed to be printing are present.
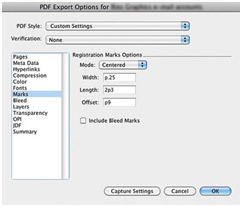
Marks
Mode — Centered.
Width — set to p.25.
Length — set to 2p3 or .375 in, depending on your Measurements settings in Preferences.
Offset — set to p9 or .125 in.
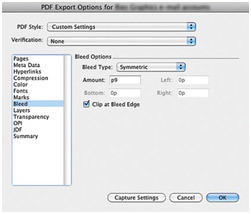
Bleed
Bleed type— set to Symmetric.
Amount — if your document has elements that bleed off the page, set the Amount to p9 or .125 in. (Bottom, Left and Right will be grayed out.)
Clip at Bleed Edge — Checked.
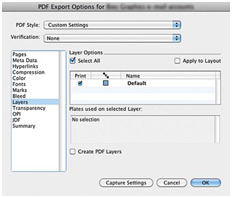
Layers
Select All — if all layers are printing, this should be Checked. If not, use the list to manually check each of the layers that will be printing.
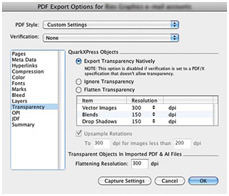
Transparency
Quark 8 and up:
Quark XPress Objects — Select Export Transparency Natively. While other settings in this panel will remain editable, they are overridden when Export Transparency Natively is selected.
Quark 7:
Transparency Rendering Options section:
Vector Images, Blends, Drop Shadows — Set the Resolution to 600 dpi.
Upsample Rotations — Checked. Set to 300 dpi for images less than 225 dpi.
Ignore Transparency Flattening — Unchecked.
OPI (not shown)
OPI Active — Unchecked.
All options should be grayed out.
JDF (not shown)
Output JDF — Unchecked.
All options should be grayed out.
Create a Preset
To create a preset with these job options so that you can use them when needed without a bunch of manual entry, go to Edit > Output Styles, click New... and select PDF. Then, use these instructions to create your preset. We suggest naming your preset something like “PDF for Ries” or “Ries Graphics Press Quality.”

